Why paint and plaster dust matters (health, electronics and fabrics)
Paint dust, sanding dust and plaster residue are more than an eyesore. The particles are often extremely fine, which means they stay airborne for longer and travel further—particularly in smaller London properties where rooms connect directly to kitchens and hallways.
- Health: Fine dust can irritate eyes and throats and can be a problem for anyone with asthma, allergies or other respiratory sensitivities.
- Electronics: Dust can be drawn into vents and fans, settle on ports, and scratch screens if wiped incorrectly.
- Fabrics and carpets: Gritty particles embed into fibres and can keep reappearing after “normal” cleaning—especially if you accidentally blow it around with a standard vacuum or dry duster.
The goal of effective post decorating cleaning is simple: stop dust spreading, remove it in the right order, and avoid methods that re-aerosolise it.
Plan and prepare: containment first
If you take only one thing from this article, make it this: contain first, clean second. Containment reduces the amount of dust that reaches bedrooms, wardrobes, sofas and electronics—meaning less time spent cleaning the rest of the flat.
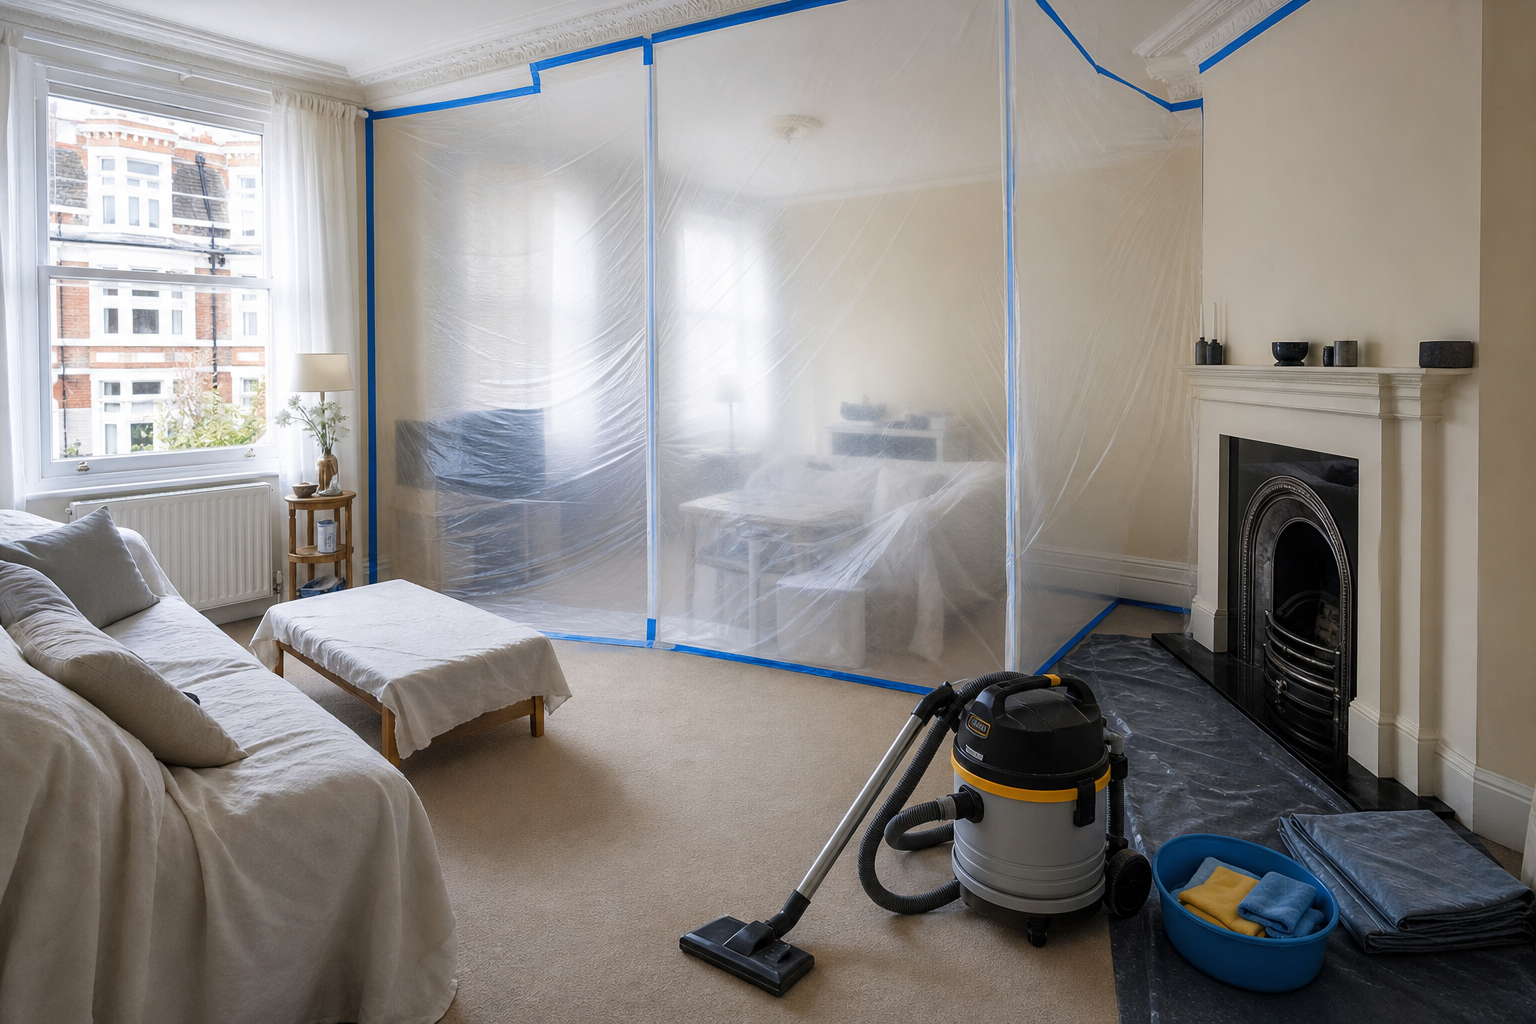
Create a containment zone — seal doors, use adhesive tape around gaps and install plastic sheeting where possible
- Close internal doors and seal gaps with low-tack painter’s tape (especially the bottom gap where dust drifts out).
- Hang plastic sheeting over doorways if there’s no door (common with open-plan living areas). Tape it to the frame/wall and create a simple overlap “entry slit”.
- Cover thresholds (between rooms or hallway) with protective film or taped-down sheeting so you don’t track dust through the flat.
Protect valuables — remove small items, cover large furniture and soft furnishings with dust sheets or breathable covers
- Remove small items from shelves, window sills and media units (they are dust magnets and slow you down later).
- Cover sofas, beds and armchairs with clean dust sheets. For delicate fabrics, use breathable cotton sheets rather than plastic directly on the upholstery (plastic can trap moisture and odours).
- Seal drawers and wardrobes if you’re sanding nearby—close them fully and consider a strip of tape along the edges if dust is heavy.
Isolate ventilation and heating — close vents and cover extractors temporarily to avoid dust circulation
- Turn off fans, air-con units and mechanical ventilation during sanding and the early clean-up so they don’t pull dust into ducting.
- Temporarily cover vents/extractor grilles with removable tape and plastic (remove after the dusty work and clean the grille before re-opening).
Important: don’t leave ventilation sealed for longer than necessary—once the main dust is removed, you’ll want controlled fresh-air exchange again.
PPE: respiratory protection and eye protection
When sanding or clearing heavy dust, wear appropriate PPE. Practical recommendations:
- Respiratory protection: use an FFP2 or FFP3 respirator (UK standard) for fine dust created by sanding or scraping. Cloth or surgical masks do not reliably filter fine plaster or paint dust.
- Eye protection: goggles or close-fitting glasses to stop particles irritating eyes.
- Gloves: disposable nitrile or work gloves to keep hands clean when handling dusty waste or wiping down surfaces.
If you suspect lead paint or other hazardous materials, stop work and seek specialist advice—hazardous dust requires regulated handling.
Tools and equipment to prioritise (HEPA, tack cloths and microfibres)
The right equipment is the difference between a one-and-done clean and a week of wiping “mystery dust” off every surface.
HEPA-filtered vacuum — why HEPA matters and when to use a dedicated dust head
A true HEPA-filtered vacuum captures fine particles instead of blowing them back into the room. Ideally use:
- a soft brush head for walls, skirting and delicate surfaces
- a crevice tool for corners, radiator edges and around sockets
- an upholstery tool for sofas, curtains and mattresses
If you’re dealing with a lot of cleaning plaster and sanding dust, consider a machine designed for fine construction dust or hiring one for the day—filters clog quickly when the dust load is heavy.
Maintenance tip: where possible, empty canisters or sealed bags outside before bringing them through the flat and seal waste in a bag. Follow the vacuum manufacturer’s instructions for replacing or cleaning HEPA filters to avoid re-exposure.
Air scrubbers / portable HEPA purifiers — creating cleaner air while you clean
A portable HEPA air purifier (or air scrubber) inside the work zone helps pull airborne dust out of the air while you work. It’s particularly useful in London flats where opening windows wide can create cross-drafts that push dust into adjacent rooms.
Microfibre cloths and tack rags — capture dust rather than smear it
- Microfibre cloths (slightly damp) lift and hold dust rather than pushing it around.
- Tack cloths are useful for a final pass on trim and painted surfaces once most dust is already removed—test first on a small area as some tack cloths may leave a slight residue on delicate or satin finishes.
Avoiding ordinary household vacuums and feather dusters — they can re-aerosolise fine dust
Feather dusters and dry sweeping can send fine particles straight back into the air. Many standard vacuums also leak fine dust through the exhaust. If you’re aiming for proper paint dust removal London standards at home, prioritise sealed filtration and gentle capture methods.
Step-by-step cleaning process after decorating
This order is designed to reduce repeat work: remove loose debris, extract dust with HEPA, then “lock in” residues with damp wiping.
1. Let settled dust fall for 20–30 minutes after the last sanding/painting task (or use an air scrubber to accelerate settling)
When sanding stops, airborne dust needs time to settle. If you clean too early, you’ll keep chasing dust that’s still floating. Run a HEPA purifier in the room if you have one, and keep doors sealed while the air clears.
2. Remove loose debris first by hand (large flakes, tape) while wearing a mask and gloves
- Pick up paint flakes, dried filler scraps and masking tape offcuts.
- Bag waste as you go so you’re not stepping on it and grinding it into floors.
3. HEPA vacuum accessible surfaces, working from high to low and from the containment boundary inwards
Work in a controlled pattern:
- Ceilings/cornices first (if dusty), then walls, then shelves and ledges.
- Skirting boards and floor edges next—dust builds up here and spreads when walked through.
- Floors last, using slow passes. For carpets, make multiple passes in different directions.
Start near the sealed boundary (doorway/plastic sheeting) and move inward, so you’re not dragging dust back out as you leave the room.
4. Wipe down surfaces with damp microfibre cloths — rinse cloths frequently and change water when visibly dirty
Use clean, lukewarm water and a lightly damp cloth (not dripping). The key is frequent rinsing:
- Fold cloths to create clean faces and rotate often.
- Change water as soon as it looks cloudy—otherwise you’ll redeposit residue.
- For painted walls, use minimal pressure to avoid burnishing or leaving shiny patches.
5. Use tack cloth for light residual dust on trim and painted surfaces
Once surfaces are mostly clean and dry, a tack cloth helps pick up the last traces on skirting, door frames and window trim. Use a gentle touch—pressing too hard can leave slight residue on some finishes, so always test a small area first.
6. Clean soft furnishings last — see dedicated section below
Leave textiles until hard surfaces are done, otherwise dust you lift from walls and ledges may settle back onto upholstery and beds.
Protecting electronics and screens
Electronics are high-risk during post-decorating cleaning: dust can scratch screens and moisture can damage components. Aim for dry methods first, then very controlled wiping only where needed.
Power down and unplug devices before cleaning
Switch off at the wall and unplug where practical. This reduces risk and makes it easier to clean around cables and sockets.
Use a soft microfibre cloth and minimal moisture — never spray liquids directly onto screens or electronics
- For screens, use a clean, dry microfibre cloth first.
- If marks remain, lightly dampen the cloth (not the device) and wipe gently.
- Avoid paper towels—they can be abrasive on coatings.
For more detailed device guidance, see how to safely clean electronics and screens.
Vacuum vents gently with a HEPA machine and soft brush attachment; consider pro servicing for desktop PCs or AV equipment heavily contaminated
Use the soft brush to avoid damaging vent fins. Don’t poke tools into ports. If you can see heavy dust inside a desktop PC, games console or amplifier vents, it may be safer to arrange professional servicing rather than forcing dust further in.
If the TV or AV is wall-mounted, temporarily remove or cover and follow manufacturer cleaning guidance
Wall-mounted setups collect dust behind the screen and around cable channels. If you need a careful method, follow how to clean behind a wall-mounted TV (step-by-step) before you start pulling cables or brackets.
Cleaning soft furnishings, curtains and carpets
Soft furnishings hold onto fine dust—especially sanding residue—so they can keep triggering sneezing or leaving a “chalky” smell even after the room looks clean.
Curtains and blinds: take down if possible and launder or steam clean per care label; otherwise vacuum with upholstery tool then wipe
- Curtains: Vacuum top to bottom using an upholstery tool. If care labels allow, launder to remove embedded dust.
- Blinds: Vacuum first, then wipe each slat with a barely damp microfibre cloth.
If you can’t remove curtains, clean the surrounding window area first so you’re not immediately re-dusting them.
Sofas and cushions: HEPA vacuum with upholstery nozzle, then spot-clean following fabric instructions; consider professional upholstery cleaning for heavy contamination
Vacuum slowly, including under cushions and along seams where dust collects. If you need a deeper refresh, follow how to clean sofa cushions to avoid over-wetting fabrics or setting stains.
Carpets and rugs: vacuum thoroughly (multiple passes) with HEPA-filtered machine; for deep dust, hot-water extraction by a pro may be needed
- Make several slow passes in different directions.
- Use the crevice tool around edges and under skirting overhangs.
- If dust has been ground in (common after plastering), professional hot-water extraction can remove deeper residue—especially in high-traffic lanes.
Managing sanding dust and plaster residue specifically
Plaster and sanding dust is abrasive. Treated the wrong way, it can scratch glossy finishes, mark freshly painted woodwork, and clog vacuum filters quickly.
Sweep up coarse debris carefully — use a dustpan with brush and dispose in sealed bags
For larger grit and chips, use a brush and dustpan first. Avoid vigorous sweeping that flicks dust into the air. Seal the waste in a bag before you move it through the flat.
HEPA vacuum immediately after sweeping to remove fine particles
Follow with HEPA vacuuming to capture what the brush can’t. Check the vacuum head for trapped grit—dragging it across laminate or varnished floors can cause fine scratches.
Damp-wipe window sills, skirting boards and ledges; check and clear light fittings and vents afterwards
- Wipe sills and ledges with a damp microfibre cloth and rinse frequently.
- Light fittings often collect a ring of dust—clean gently once bulbs are cool and power is off.
- Once the room is clean, remove vent covers and wipe them separately before refitting.
Ventilation and indoor air quality while cleaning
Ventilation is helpful—but in open-plan spaces it can also spread dust. Think “controlled airflow” rather than throwing every window open at once.
Use portable HEPA air purifiers inside the containment zone and in adjacent rooms
Run one inside the work zone to capture airborne particles, and—if you have a second unit—run it just outside the containment area to protect the rest of the flat. For more on maintaining healthier indoor air through cleaning routines, see how to improve indoor air quality through cleaning.
Create a gentle exhaust flow if safe — a window fan set to blow out can help remove airborne particles, keeping neighbouring doors sealed
If you can safely open a window in the work zone, a fan pointing outward can help exhaust dusty air. Keep other internal doors closed so you’re not pulling air (and dust) through the home.
Avoid cross-drafts that move dust through open plan spaces; open windows only when dust levels are low or after initial cleaning
In many London flats, one open window can create a corridor of airflow through the property. Save wide ventilation for after the first HEPA vacuum and wipe-down, when there’s less loose dust available to travel.
Safe disposal and post-clean checks
Disposal is part of dust control. The wrong removal method (for example shaking a dust sheet in the hallway) can undo your work.
Seal disposable dust sheets, filters and used cloths in heavy bags before removing from the containment zone
- Fold dust sheets inward (dust side in) and bag them before carrying through shared corridors or stairwells.
- Bag disposable masks and single-use cloths immediately.
Replace or professionally clean vacuum filters once finished; follow manufacturer guidance for HEPA canister disposal
Fine plaster dust is notorious for clogging filters. Empty canisters outdoors if possible and only after the dust has settled inside. Follow your vacuum’s manual for filter care—especially if it has a sealed HEPA cassette.
Do a final walk-through: check electronics, upholstery and high surfaces for remaining residue
Use a torch (phone light works) held sideways to spot lingering haze on shelves, picture frames, the top of doors and behind monitors. If you find residue, repeat: HEPA vacuum first, then a light damp wipe.
When to call professional cleaners
Some decorating clean-ups are manageable with careful containment and the right tools. Others are simply faster and safer with specialist equipment—particularly where dust is extensive or the property layout makes containment difficult.
Large-scale sanding, extensive plastering, or visible dust inside ventilation systems
If you’ve sanded multiple rooms, removed artex (where permitted and safely managed), or plastered extensively, dust may be in places that need a systematic approach. A dedicated paint dust removal London team will typically use HEPA-led extraction methods and detailed checklists. You can compare your own plan with this after-builders cleaning checklist.
If occupants have respiratory conditions or the property is a delicate furnished flat with high-value electronics
If anyone in the home is sensitive to dust, or you have lots of soft furnishings and tech in an open-plan area, it’s often worth reducing exposure by outsourcing the heaviest part of the clean.
When time is limited and you prefer a thorough, HEPA-led clean to avoid repeat work
Repeat cleaning is the hidden cost of DIY dust removal. If you’d rather get back to normal quickly, professional post-decorating support can be a practical option. If you’re exploring services, see what to do after decorating — professional post-decorating and after-builders cleaning options.
Need help finishing the clean after decorating? Go Cleaners London provides HEPA-led post-decorating and after-builders cleans across London flats. Visit gocleanerslondon.co.uk — contact the team for practical advice tailored to your flat’s layout and ventilation.